
In this article, we again explore the intricacies of register-transfer-level (RTL) coding, investigating several often-overlooked topics that frequently lead to pitfalls in design. We then discuss more general verification techniques that help identify these pitfalls, and others as soon as possible. To help connect these topics, we use the following example, which has a subtle, but significant problem.
Example Timer Code
If you’re wondering why I’m being deliberately vague about the specific topics, it’s because I want you to look over the code and see if you can discover the problem yourself. Take a moment to thoroughly examine the following example before proceeding. The code implements a timer that upon the assertion of go, asserts done after some number of cycles, specified by the CYCLES parameter. Done remains asserted indefinitely until go is asserted again. When the timer is active (i.e., not done), the timer ignores the go input.
module timer #(
    parameter int CYCLES = 16
) (
    input  logic clk,
    input  logic rst,
    input  logic go,
    output logic done
);

    typedef enum logic {
        INACTIVE = 1'b0,
        ACTIVE
    } state_t;
    state_t state_r, next_state;

    localparam int NUM_BITS = $clog2(CYCLES);
    logic [NUM_BITS-1:0] count_r;
    logic [NUM_BITS-1:0] next_count = '0;

    always_comb begin
        next_state = state_r;

        case (state_r)
            INACTIVE: begin
                done = 1'b1;
                next_count = count_r;
                if (go) next_state = ACTIVE;
            end

            ACTIVE: begin
                done = 1'b0;
                next_count = count_r + 1'b1;
                if (count_r == NUM_BITS'(CYCLES - 1)) begin
                    done = 1'b1;
                    next_state = INACTIVE;
                end
            end
        endcase
    end

    always_ff @(posedge clk) begin
        count_r <= next_count;
        state_r <= next_state;
        if (rst) state_r <= INACTIVE;
    end
endmodule
To maintain conciseness, the timer in the example is slightly unconventional, although the issue does not lie with its timing strategy. Instead, there’s a flaw within the code itself. Let’s simulate it to evaluate its functionality. Below is a waveform depicting the behavior for CYCLES=8:

Initially, done is undefined but is asserted on the first rising clock edge, which is correct functionality of a synchronous reset. Once the reset is cleared, go is asserted, and as expected, done is asserted 8 cycles later. This simulation indicates that the design functions as intended. So, where does the problem lie?
Mid-test Resets
I won’t reveal the specific issue just yet, but let’s discuss why our simulation failed to uncover it: we didn’t rigorously test the reset functionality. You might find this confusing since the waveform unmistakably depicts the reset being asserted and subsequently cleared at the start of the simulation—a practice typical in the construction of most testbenches. However, this widespread practice has limitations, as we will soon discover. To overcome these limitations, we need to follow a simple guideline: incorporating mid-test resets is essential for exposing all potential reset problems. Let’s see why.
Let’s expand our simulation by introducing another test that resets the timer while active (i.e., a mid-test reset):

In this test, we asserted go and then subsequently reset the design 5 cycles later. At first glance, the functionality still appears correct. Done is promptly cleared upon the assertion of go and then reasserted following the reset. Although the reassertion of done doesn’t occur 8 cycles later, this discrepancy is expected due to the reset. Thus far, we haven’t encountered any apparent issues. Let’s proceed with one more test: repeating the original test following this mid-test reset:

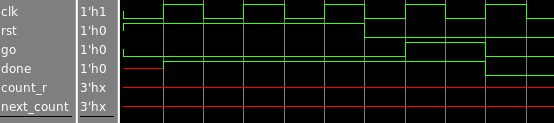
We now see a problem! Upon asserting go, done is unexpectedly asserted on the 3rd cycle instead of the expected 8th cycle. To gain further insight, let’s incorporate the count signals into our waveform to aid in our investigation:

This waveform starts at the 2nd test (the one that applies the mid-test reset) and then proceeds to the problematic test. Upon closer inspection, a problem becomes apparent immediately after the mid-test reset: the count signals fail to reset. This observation indicates that our issue is indeed related to the reset functionality.
If we examine this section of the code, we can easily spot the issue:
    always_ff @(posedge clk) begin
        count_r <= next_count;
        state_r <= next_state;
        if (rst) state_r <= INACTIVE;
    end
We aren’t actually resetting the count_r register, which explains the observed behavior. The fix is clear at this point: we just need include count_r in the reset functionality. However, what warrants consideration is why this issue manifested only after the mid-test reset, despite seemingly working in the initial test.
Stop Initializing Signals in RTL Code
The issue with the reset was concealed by just a few characters in one seemingly innocuous line of code:
logic [NUM_BITS-1:0] next_count = '0;While our intention was to declare the next_count signal, the problem lies in initializing it to 0, a common practice. While initializing a signal isn’t inherently problematic, it’s crucial to understand its implications for both simulation and synthesis.
First, I need to make it clear that there is a difference between initializing a signal and using a default value for a signal. Parameters, inputs, and outputs for a module can have default values that are syntactically identical to initialization and are perfectly acceptable. By “initialization,” I’m specifically referring to situations where an internal signal is initialized when it is declared.
The issue stems from the fact that signal initialization doesn’t typically translate directly to synthesized hardware. In simulation, the simulator simply assigns the specified value to the signal at the start of the simulation. However, in hardware, there’s no clear equivalent to assigning a signal at the start of the circuit. The concept of a circuit’s “start” is ambiguous in hardware, as hardware doesn’t have a defined starting point like simulation does. This disconnect between simulation and hardware behavior can lead to unexpected discrepancies and errors, underscoring the importance of understanding the implications of initialization in both contexts.
Understanding what kind of hardware a signal becomes during synthesis is crucial. In many cases, such as in our code example, the signal will become a wire. Specifically, the next_count signal will transform into a wire connected to the output of a multiplexer that selects between count_r and count_r + 1. But how do you initialize a wire in hardware? You don’t. A wire has a source that provides its value at all times. Attempting to initialize a signal that becomes a wire is essentially asking the synthesis tool to perform an impossible task. In my experience, synthesis tools often proceed without issuing a warning, simply ignoring the signal initialization altogether. This underscores the importance of being mindful of the hardware implications when initializing signals in RTL code.
Given that synthesis tools typically disregard signal initialization, we’re faced with the notorious dilemma of simulation behavior diverging from synthesized behavior. It’s imperative to avoid this situation at all costs, as debugging such issues can be exceedingly arduous, particularly for larger examples that entail lengthy compilation times, sometimes stretching to hours or even days. This frustrating predicament is what drove many of my former students away from hardware design.
Perhaps unsurprisingly, this issue is yet another instance of the importance of designing the circuit before writing the code, a methodology I frequently emphasize. By initializing a signal, which may seem harmless in many other programming contexts, we fail to consider its effect (or lack thereof) on the synthesized hardware.
So, if we heed my advice of refraining from initializing signals and rerun the simulation, we observe that it now fails after the first reset. Done will never be asserted after the assertion of go because the count_r register doesn’t receive the 0 value that we used to initialize next_count. Instead, it remains undefined indefinitely. Essentially, the original initialization of next_count was inadvertently assigned to count_r , effectively masking the problem of the missing reset.
What do we learn from this? Firstly, we should refrain from initializing signals in synthesizable RTL code without a very good reason. This practice, although widespread, needs to be discontinued. While this example’s issue was relatively easy to identify, signal initialization often masks problems that may later arise on the FPGA, leading to excessively long debugging sessions. Ultimately, our goal is to ensure that our simulation accurately reflects FPGA execution, and signal initialization is a common source of these discrepancies.
Secondly, it’s crucial to incorporate at least one mid-test reset. As we’ve just witnessed, reset problems may not necessarily surface at the simulation’s outset. While not every test needs to include multiple resets, it’s essential to have at least one test that treats the reset as a stimulus, akin to every other input to your design or device under test (DUT).
When is it OK to initialize a signal?
I rarely advocate for an absolute prohibition on any practice, as there’s usually a rare situation where it may be justified. This principle also extends to signal initialization. To the best of my knowledge, I’ve encountered only one situation involving FPGAs where intentionally initializing a signal makes sense.
FPGAs possess a unique characteristic compared to ASICs in that they can load initial values (often referred to as “power-up” values) into flip-flops during configuration. Essentially, during synthesis, the initialization value for a register signal is included in the bitstream, which is then loaded into the register while configuring the FPGA, even before reset is applied. If you’re intentionally leveraging this feature, then it’s perfectly acceptable to initialize signals corresponding to registers. For instance, you could safely implement the following:
logic [NUM_BITS-1:0] count_r = '0;However, initializing next_count was not safe because it is not a register, causing synthesis to ignore its initial value.
The use of power-up register values offers the advantage that after bitstream configuration, your circuit can start without even requiring a reset. This feature can be incredibly useful in various use cases, but it’s crucial to exercise caution. Leveraging power-up flop values has the potential to enable you to completely eliminate the need for a reset in your design. This removal of the reset can lead to significant improvements in timing optimization, as it eliminates a high fan-out signal that often limits clock frequencies. However, it’s important to note that you sacrifice one critically important feature: the ability to reset your design. If you choose to utilize power-up values, ensure that a reset is implemented as a hard reset that actually reconfigures the FPGA, as there’s no way to reset the registers without loading a bitstream.
How can you quickly identify these types of problems in a testbench?
Encountering unexpected issues like the one discussed in this article can consume a significant amount of time in identifying the exact problem. To excel as a designer, it’s crucial to possess the ability to swiftly identify and rectify unexpected issues. However, given the unpredictable nature of such problems, how can you ensure prompt discovery? The answer, as is often the case, lies in crafting an effective testbench.
Many designers (myself included) can sometimes become complacent with their testbenches, allowing these types of problems to slip through the cracks of incomplete coverage. After all, many designers are designers because they prefer designing over writing testbenches. And, in many situations, we can get away with weaker testbenches. However, while identifying issues in a small design may be relatively straightforward, it becomes significantly more challenging for larger designs with thousands of signals.
Fortunately, there are some simple yet extremely powerful techniques we can incorporate into most testbenches to easily catch many of these issues. If you were a student in my classes, or even if you’ve listened to me talk for a while, you probably know that I am obsessed with SystemVerilog assertions (SVAs). Like most people, I was initially intimidated by the new syntax and complexity. However, what I came to realize is that once you understand them, they are an incredibly useful tool that allows you to replace vast amounts of traditional testbench code.
While writing the code for this article, I recognized that this example presented an excellent opportunity to introduce people to the power of assertions without any intimidating code. Although the scope of assertions is extensive (for all the details, see Ben Cohen’s articles), the aim of this article is to provide you with an introduction to them and convince you that they are worth learning.
When designing a circuit, writing the corresponding code, or developing a testbench, I consistently strive to identify properties of the circuit that should always hold true (or should never hold true). Whenever I identify such a property, I promptly add an assertion. I cannot emphasize enough how much time this practice has saved me in debugging and testbench development. I even put assertions in my synthesizable modules, although discussing when I decide to do that as opposed to a testbench is probably too far off topic for this article.
Let’s consider some of the properties of this timer example. As previously defined, we understand that after go is asserted while the timer is inactive (i.e., go && done), the timer should assert done after CYCLES cycles. While we could of course write behavioral testbench code that verifies this timing, that would lack conciseness and could be error-prone. With assertions, we can precisely define this property in a very concise manner:
    assert property (@(posedge clk) disable iff (rst) go && done |-> ##CYCLES done)
    else $error("[%0t] done not asserted when expected.", $realtime);
From left to right, this assertion instructs to check the following expression (referred to as a sequence) by sampling the specified values on each rising clock edge (@(posedge clk), while ignoring situations where reset is asserted (disable iff (rst)). The sequence specifies that if go and done are both asserted (i.e., the timer is starting) this implies (|->) that CYCLES cycles later (##CYCLES) done should be asserted. Essentially, the assertion allows us to define a Boolean expression across time. Hopefully you see how this one line of code provides the vast majority of the testing functionality we need in our testbench.
We aren’t finished yet because the previous assertion only verifies if done is asserted after CYCLES cycles. It’s possible for done to be asserted before that and remain asserted, in which case the previous assertion would still pass. We also need to ensure that done is not asserted for CYCLES-1 cycles after the timer is started. Once again, we can achieve this with just one line of code:
    assert property (@(posedge clk) disable iff (rst) go && done |=> !done [* (CYCLES - 1)])
    else $error("[%0t] done asserted too soon.", $realtime);
This new assertion specifies that the start of the timer implies that done will be 0 for the next CYCLES-1 cycles. Most of this functionality is enabled by the consecutive-repetition operator ([*(CYCLES-1)]), which in general specifies that some preceding condition must be true for the specified amount of time. For example, “x [*10]” specifies that x should be asserted for 10 consecutive cycles.
Additionally, you can easily add explicit reset checks to ensure there are no issues. For instance, if we want to verify that done is asserted by the reset, we can easily achieve that with the following assertion:
    assert property (@(posedge clk) rst |=> done)
    else $error("[%0t] done not asserted during reset.", $realtime);
Moreover, SystemVerilog enables us to access signals anywhere in the design hierarchy, enabling us to inspect signals within the DUT to check their status. If we had the following reset assertion in the testbench (or module), it would have promptly alerted us to the problem during the 3rd test:
    assert property (@(posedge clk) rst |=> DUT.count_r == '0)
    else $error("[%0t] count_r not cleared during reset.", $realtime);
Our timer has another property where we want done to remain asserted upon completion until go is asserted again. Again, we can very concisely capture that property with an assertion:
    assert property (@(posedge clk) disable iff (rst) $fell(done) |-> $past(go, 1))
    else $error("[%0t] done cleared without assertion of go", $realtime);
This assertion says the done falling from 1 to 0 implies that go must have been asserted in the previous cycle.
Again, assertions are a deep topic that I cannot fully explain here, but I hope this brief introduction convinced you of their usefulness. If you’re still not convinced, try replacing these five assertions with traditional testbench code. You’ll almost certainly be convinced then.
Relevant Common Interview Question
While crafting the code example for this article, I stumbled upon a perfect illustration of a very common SystemVerilog interview question: what is the difference between always @(*) and always_comb?
In my initial drafts, I tried something like this counter:
module counter #(
    parameter int WIDTH = 16
) (
    input  logic clk,
    input  logic rst,
    output logic [WIDTH-1:0] count
);

    logic [WIDTH-1:0] next_count = '0;
    logic [WIDTH-1:0] count_r;

    always @(*) begin
        next_count = count_r + 1;
    end

    always_ff @(posedge clk) begin
        count_r <= next_count;
    end

    assign count = count_r;

endmodule
This code resulted in a simulation that demonstrated a problem similar to what I wanted to show, where basically the count increases despite count_r never being reset:

Interestingly, when you change the always @(*) to always_comb, the reset problem is more obviously exposed by the simulation:

The reason for this difference is that always @(*) only executes when one of the inputs in the sensitivity list changes. In this case, the only input is count_r, and since it is never reset, it never changes at the beginning of the simulation. It changes for the first time on the first rising clock edge, and since next_count was initialized to 0, count_r is assigned 0, which mistakenly makes it appear as though it was correctly reset.
By contrast, always_comb exposes the problem because, in addition to executing when an input changes, it also always executes at time 0 during the simulation. When we start the simulation, the simulator initializes next_count to 0, but it then executes the always_comb. At this point in the simulation, count_r is still undefined, which then gets assigned to next_count.
There are various other differences between always_comb and always @(*), but this example illustrates on of the biggest differences.
Acknowledgements
I would like to dedicate this article to Chris Spear, who I recently learned passed away in February. Chris was well known in the verification community and authored the widely used book SystemVerilog for Verification. I consider myself very fortunate to have received UVM training from Chris. This article was actually inspired by a conversation I had with him about the need for mid-test resets. He jokingly said I was more excited about assertions than anyone he had ever met. I hope to share much of that excitement and what he taught me with others here.
I’d also like to thank my former students Jackson Fugate, Chris Crary, and Wes Piard for their feedback on this article.
Appendix: Testbench for Timer Example
If you would like to rerun the simulations for the waveforms included in this article, here is the testbench code. Please note that this is not intended to be a comprehensive testbench. Its purpose was to quickly create the problems I wanted to illustrate. Also, be aware that SystemVerilog assertions may not work in some free simulators. For instance, free versions of ModelSim may compile without errors but then simply ignore the assertions during simulation:
// Greg Stitt
// StittHub (stitt-hub.com)

`timescale 1 ns / 100 ps

module timer_tb #(
    parameter int CYCLES = 8
);

    logic             clk;
    logic             rst;
    logic             go;
    logic             done;

    timer #(.CYCLES(CYCLES)) DUT (.*);

    initial begin : generate_clock
        clk = 1'b0;
        while (1) #5 clk = ~clk;
    end

    initial begin
        $timeformat(-9, 0, " ns");

        // Reset the circuit.
        rst <= 1'b1;
        go  <= 1'b0;
        repeat (3) @(posedge clk);
        @(negedge clk);
        rst <= 1'b0;

        // Apply the three tests in the article.
        // The first is a normal test.
        // The second (i==1) applies a mid-test reset.
        // The third applies another normal test (which will fail).
        for (int i = 0; i < 3; i++) begin
            @(posedge clk);
            go <= 1'b1;
            @(posedge clk);
            go <= 1'b0;

            if (i == 1) begin
                repeat (4) @(posedge clk);
                rst <= 1'b1;
                @(posedge clk);
                rst <= 1'b0;
            end

            @(posedge clk iff done);
        end

        repeat (5) @(posedge clk);
        $display("Tests completed.");
        disable generate_clock;
    end

    assert property (@(posedge clk) disable iff (rst) go && done |-> ##CYCLES done)
    else $error("[%0t] done not asserted when expected.", $realtime);

    assert property (@(posedge clk) disable iff (rst) go && done |=> !done [* (CYCLES - 1)])
    else $error("[%0t] done asserted too soon.", $realtime);

    assert property (@(posedge clk) rst |=> done)
    else $error("[%0t] done not asserted during reset.", $realtime);

    assert property (@(posedge clk) rst |=> DUT.count_r == '0)
    else $error("[%0t] count_r not cleared during reset.", $realtime);

    assert property (@(posedge clk) disable iff (rst) $fell(done) |-> $past(go, 1))
    else $error("[%0t] done cleared without assertion of go", $realtime);

endmodule